Recently, one of my clients asked me how to export slugs of his WooCommerce products from his old website to his new WooCommerce website. I’d never faced this question before, so I was sure that the WooCommerce CSV Importer and Exporter had this feature by default. Well, I was wrong: for some reason, it does not.
However, I found an easy way to extend its default features and make it possible to export and import WooCommerce product slugs. So I hope that my solution will be helpful for people that have the same question in the future.
Let’s get started!
How to export WooCommerce product slugs?
Let’s start with the export. If you go with the default slugs that WordPress generates for you, you probably don’t need this post at all. However, if you have manually modified your products’ slugs, it makes sense to migrate them if you export your products to a new website.
By default, the WooCommerce Product Exporter does not have a column like “Slug” or anything like this. Luckily, this part of WooCommerce inherits the WordPress philosophy of extensibility by action and filter hooks.
Using the official Product CSV Importer & Exporter guide by WooCommerce let’s add a new export column. By the way, I highly recommend you to check this guide if you want to learn more about extending the WooCommerce import/export suite. Here’s the code I’m going to use:
add_filter( 'woocommerce_product_export_column_names', 'add_slug_export_column' );
add_filter( 'woocommerce_product_export_product_default_columns', 'add_slug_export_column' );

function add_slug_export_column( $columns ) {
	$columns['slug'] = 'Slug';

	return $columns;
}
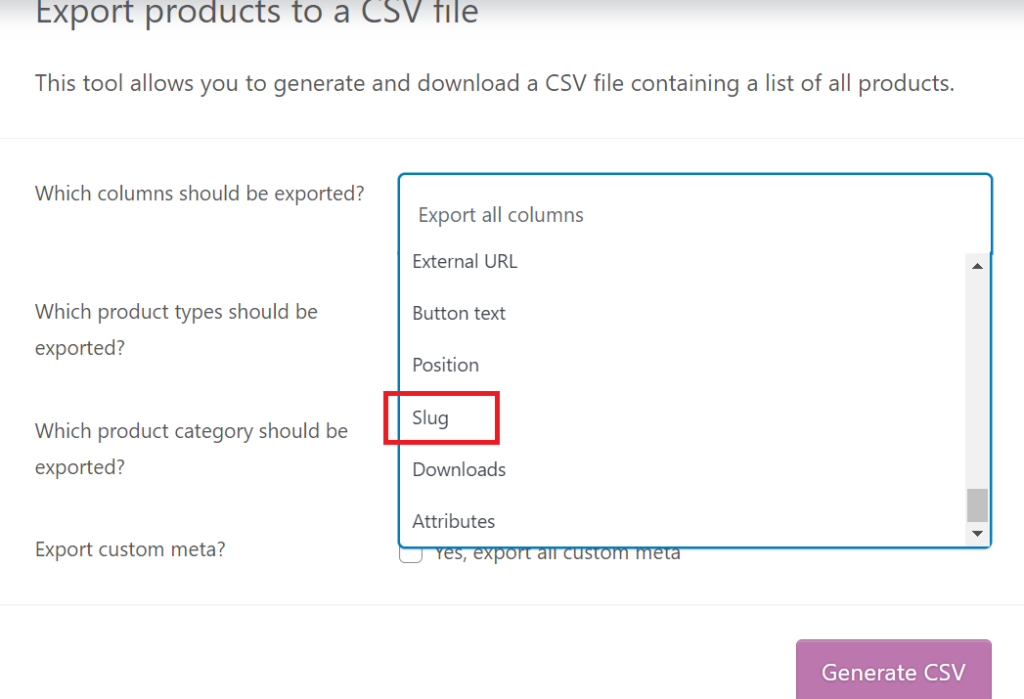
Now, if I go to the product exporter, I see the new column I can choose to export:

Looks good, but we’re not done yet.
Now, we need to tell WooCommerce what data it should use for this column.
The official guide I mentioned above uses $product->get_meta() for this. Product slugs are not meta fields, but we can get them a similar way:
add_filter( 'woocommerce_product_export_product_column_slug'  , 'add_export_data_slug', 10, 2 );
function add_export_data_slug( $value, $product ) {
    $value = $product->get_slug();

    return $value;
}
Note that in the woocommerce_product_export_product_column_slug filter’s name slug is a dynamic part which corresponds to the column’s ID you specified in the previous snippet.
Let’s run an export to test if everything works as expected.
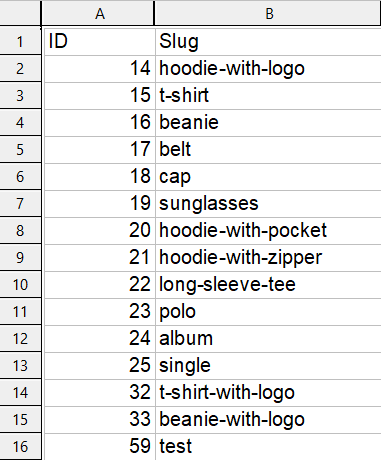
Here’s the CSV file I got as the result:

Nice, just what we need.
The exporting part is done. Now we need to tell WooCommerce how to use this column while importing products.
How to import WooCommerce product slugs?
Using another section of the same guide, we can add Slug column support to the products importer as well.
add_filter( 'woocommerce_csv_product_import_mapping_options', 'add_slug_import_option' );
function add_slug_import_option( $options ) {
  $options['slug'] = 'Slug';

  return $options;
}

add_filter( 'woocommerce_csv_product_import_mapping_default_columns', 'add_default_slug_column_mapping' );
function add_default_slug_column_mapping( $columns ) {
  $columns['Slug'] = 'slug';

  return $columns;
}

add_filter( 'woocommerce_product_import_pre_insert_product_object', 'process_import_product_slug_column', 10, 2 );
function process_import_product_slug_column( $object, $data ) {
  if ( !empty( $data['slug'] ) ) {
    $object->set_slug( $data['slug'] );
  }

  return $object;
}
Basically, you can add the snippet above to your new website to import slugs from the CSV file you created in the previous section.
That’s all. We successfully migrated product slugs from one website to another.
Final code
add_filter( 'woocommerce_product_export_column_names', 'add_slug_export_column' );
add_filter( 'woocommerce_product_export_product_default_columns', 'add_slug_export_column' );

function add_slug_export_column( $columns ) {
	$columns['slug'] = 'Slug';

	return $columns;
}

add_filter( 'woocommerce_product_export_product_column_slug'  , 'add_export_data_slug', 10, 2 );
function add_export_data_slug( $value, $product ) {
    $value = $product->get_slug();

    return $value;
}

add_filter( 'woocommerce_csv_product_import_mapping_options', 'add_slug_import_option' );
function add_slug_import_option( $options ) {
  $options['slug'] = 'Slug';

  return $options;
}

add_filter( 'woocommerce_csv_product_import_mapping_default_columns', 'add_default_slug_column_mapping' );
function add_default_slug_column_mapping( $columns ) {
  $columns['Slug'] = 'slug';

  return $columns;
}

add_filter( 'woocommerce_product_import_pre_insert_product_object', 'process_import_product_slug_column', 10, 2 );
function process_import_product_slug_column( $object, $data ) {
  if ( !empty( $data['slug'] ) ) {
    $object->set_slug( $data['slug'] );
  }

  return $object;
}
Summary
Although I believe that this feature should come with WooCommerce by default, as you see, it’s pretty easy to implement it on your own.
As always, I hope you found this post helpful.
If you have any questions or issues, feel free to write about them in the comments section under this post or even contact me directly.
Don’t forget to follow me on LinkedIn if you don’t want to miss new posts on my blog.
Thank you for your attention; see you in the next one!


Thank you so much! I also need to export the release date of all products. Is there a similar way to add possibility to export it?
Hi Ben! What do you mean by “release date”? Do you use a custom field for that?
Thanks for the quick reply. No, I am talking about the publishing date of the products by woocommerce. We are sorting all our products according to the publish date from old to new but now we want to scramble it up. Since we have over 5000 products I would like to edit the publish dates in excel via csv. But the product exporter doesn´t export the publish date :/
Oh, I see. Well, you can use my post as a reference. Use get_the_date() function to get a post’s publish date. To update a post’s date, take a look at this tutorial.
Sorry for this noob question, but where do you add the code? Is it somewhere in the backend environment of wordpress or in a specific php file?
You can add this code to your theme’s functions.php file or use a plugin like Code Snippets.
Also, you can create your own plugin using this code, but I guess it’d be too much for you 😅
Perfect coding2, thank you so much!
Thank you for your comment 🙂
How this isn’t core is beyond me. Adding this to the “things to do after install” checklist. It’s quite large!
Maybe someday 🙂
Thank you for your comment
Hi Kayart!
I just implemented the solution but I am getting an error message – Undefined variable $object
Hi! Please, share the full code you’re trying to add. You can use Pastebin or Pastecode to share your snippets.
Amazing code by the way! It has saved me a lot of time.
I ran into the same issue as Pranav when just adding the “final code” portion to the “code snippets” plugin, the plugin didn’t want to activate it.
In order to make it work, i just add the code separately, adding each 3 codes in the plugin, and then it worked.
Hope it helps, I’m just a regular user so not really into coding XD.
That’s strange but thank you for sharing this 😅
This snippet can help to export the product url
add_filter('woocommerce_product_export_column_names', 'add_full_url_export_column'); add_filter('woocommerce_product_export_product_default_columns', 'add_full_url_export_column'); function add_full_url_export_column($columns) { $columns['product_full_url'] = 'Product URL'; return $columns; } add_filter('woocommerce_product_export_product_column_product_full_url', 'add_export_data_full_url', 10, 2); function add_export_data_full_url($value, $product) { $site_url = get_site_url(); $value = trailingslashit($site_url) . 'product/' . $product->get_slug() . '/'; return $value; }Hi! Thank for your comment. In my opinion, it’s better to use
$product->get_permalink()instead oftrailingslashit($site_url) . 'product/' . $product->get_slug() . '/'