Hi again, long time no see! After having a small writer’s block, I decided to come back with a new post about BuddyPress development. In today’s post, we’ll see how to add custom fields to the BuddyPress activity form.
As I have previously said, by default, BuddyPress has only the very basic features. So the default new activity form has only one textarea field. It’s enough to communicate, to deliver an idea but sometimes you want to have something more complex. Maybe you want to allow your users to share their geolocation. Or maybe your users want to better structure the information they share.
No matter what exactly brought you here, you probably already know why you need to add custom fields to the BuddyPress activity form. So let’s get started!
Introduction
If you’ve read any of my previous posts, you already know that I like to use realistic examples when I write tutorials. This time is no exception.
Let’s imagine that at some point our BuddyPress group became something more than just a way for members to chat. They became a better organized structure and now they want to gather together sometimes.
And let’s imagine that our group is very active. The activity feed is constantly updated with new posts and comments. So we better have a way to mark, to highlight new gathering announcements.
Let’s add a checkbox under the default textarea field. This checkbox will be visible only to the group administrators. And if the activity was marked as an announcement, we’re going to highlight it somehow with some additional CSS rules to make it more visible in the feed.
How to add custom fields to the activity form?
Sometimes, extending the default BuddyPress features is a real headache. Luckily, not this time.
First of all, you can edit the template of the activity post form. In this case, everything will depend on what version of BuddyPress you use and what theme you use on your website. In most cases, the main thing is that your custom field should be somewhere inside the whats-new-form form.
The alternative way I prefer is to use one of the BuddyPress (or your theme) hooks. Most of them support the bp_activity_post_form_options action hook that fires right under the activity text field.
<?php

add_action( 'bp_activity_post_form_options', 'render_custom_activity_fields' );
function render_custom_activity_fields() {
	if ( ! bp_is_groups_component() ) {
		return;
	}

	if ( ! groups_is_user_admin( get_current_user_id(), bp_get_current_group_id() ) ) {
		return;
	}
    ?>

    <input type="checkbox" name="is_announcement" id="is_announcement" value="1" />
    <label for="is_announcement">Is announcement?</label>

    <?php
}
Now, if I go to the group page and click on the activity textarea field, I see my custom checkbox:

I’ve added a small margin between the checkbox and its label, but you should see almost the same result.
How to save the custom activity data
But for now, our custom checkbox is just a few additional HTML tags for BuddyPress. It doesn’t affect the backend logic of an activity. We need to save the checkbox value.
To achieve this, we need to use the bp_activity_after_save action hook that fires after a new activity was inserted into the database. This action handlers accept one argument and this is the instance of the current activity (passed by reference).
BuddyPress activities, just as WordPress posts, can have meta fields and BuddyPress comes with some in-built functions to work with the activity meta data.
For example, to save or update a meta field, we can use the bp_activity_update_meta() function:
add_action( 'bp_activity_after_save', 'save_custom_activity_fields', 10, 1 );
function save_custom_activity_fields( $activity ) {
    if ( isset( $_POST['is_announcement'] ) ) {
        bp_activity_update_meta( $activity->id, 'is_announcement', sanitize_text_field( $_POST['is_announcement'] ) );
    }
}
Now, let’s test everything out and create a new activity and mark it as an announcement. This is the first post I write after ChatGPT was publicly released, so I asked it to write an announcement about an imaginary gathering of WordPress developers in Kyiv, the city I live in, on August 24, the Independence Day of Ukraine.

Now, if I click on the submit button, my new activity will appear but I won’t see the difference. Let’s check if the data was really saved and highlight our new announcement as well as all future ones.
To do this, I’m going to add a new CSS class to every activity that has the is_announcement meta field.
This time, I’m going to use another filter hook that many BuddyPress themes have —bp_get_activity_css_class. This hook allows you to customize the class list of an activity. Pay attention: your filter handler will get the class list as a string, not an array.
add_filter( 'bp_get_activity_css_class', 'add_custom_class_to_announcement_activities', 99, 1 );
function add_custom_class_to_announcement_activities( $activity_class ) {
	// This is a global variable that can give you access to the current activity in the loop
	global $activities_template;

	$activity_id = $activities_template->activity->id;
	$is_announcement = bp_activity_get_meta( $activity_id, 'is_announcement', true );

	if ( $is_announcement ) {
		$activity_class .= " announcement";
	}

	return $activity_class;
}
I’m not the greatest designer so I’ll just add a red border to all activities that have the announcement CSS class.
.groups.activity_update.announcement {
	border: 3px solid red;
}
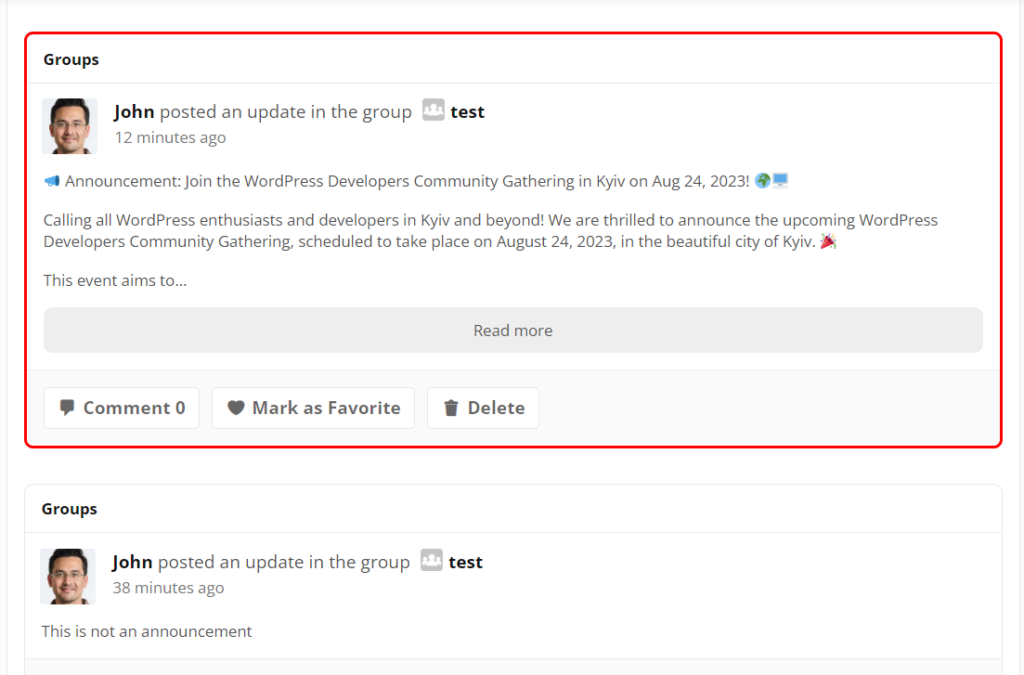
Now, after we added both code snippets, let’s update the page and see if anything has changed:

Great! The activity that I marked as an announcement has a red border while the regular activity post right after doesn’t have it. Everything works just as we expect.
Summary
Custom activity fields in BuddyPress offer endless possibilities for enhancing engagement and personalization. You can extend the BuddyPress activity form with event details, tags, media attachments, and so on, creating a dynamic and interactive experience for your users.
I hope you found this post helpful.
If you have any questions or issues, feel free to write about them in the comments section under this post or even contact me directly.
Don’t forget to follow me on LinkedIn if you don’t want to miss new posts on my blog.
Thank you for your attention; see you in the next one!


I have a buddypress with a theme(youzify), I want to display activitys posts randomly on home page, I want posts to be displayed randomly, not in chronological order
anyone knows any code or method for that
Check these links:
https://buddypress.org/support/topic/sorting-activity-stream/
https://wordpress.stackexchange.com/questions/176989/buddypress-activity-search-with-or-query-instead-of-and
They are not the answer to your exact question, but might be helpful to find a solution for your case.
Are you using any buddypress theme or just the plugin? I want to show the meta icons like yours in bp nouveau. Currently it’s just showing the icons.
Hey Chris. I used BuddyPress with the BuddyX theme for this specific post. What do you mean by the meta icons and what exactly you tried to do?
The row with the Favorite, Comment, Delete buttons in Buddypress. I would like to make it look like facebook buttons. (with text and custom icons).
As I said, I used the free version of this theme:
https://wordpress.org/themes/buddyx/
Thank you for sharing this. But I am already with Generatepress. I don’t want to change the theme as my blog is fast and it scores better on Google page insights. I am adding buddypress as a community for the current blog, so changing the blog theme is difficult.But I will try to get the desired design for the buttons.
Hi! Thanks so much for this post because most info one can find about BuddyPress customizations are very outdated.
I’m trying to do a pretty simple move:
To add an iframe with a $_GET value and just display it.
I tried Your function, I also added it to activity-loop.php in new and legacy theme. Nothing is showing! Any helpful pointers?
Hi Mike! Where exactly do you want to show the iframe?
Hi, Can can i add this as a new plugin for bp. if so where should i place my file. if not where should i place my file
How to Add Custom Code to WordPress
or
WordPress Code Snippets Plugin Tutorial
Artemy –
Great BuddyPress hooks!! I tried to use your approach to accomplish the following and for some reason cannot make it work
An activity that is provided 4 custom field options checkboxes each with their own color option that, on save, results in the activity with the color border for the checkbox value selected.
The variations on the snippets were:
I’m sure that I missed a key step. I’m using WP 6.6.2, Twenty Twenty Four theme, BP 14.2.1 with Nouveau and a number of plugins – but nothing that impacts the firing under the activity text field.
I used WP Code Snippets plugin for the snipppets.
If you have time and can post (or email back) a way to do this – I would really appreciate it. I’ve spent days trying to figure it out.
Hi Jim! Sure, feel free to email me with more details – @kayart.dev">artemy@kayart.dev